Home | Beginnings | Flood | Foundation pour | Blocks & tanks | Cistern
Stacking| Prep for wall pour | Wall pour | Floor beams | Floor pan | Floor pour
Stacking II | Interior walls | Moving up | Decks | Upstairs | Roof | Roof II
Dogrun | Roof III | Sticks 'n stones | Decks II | Floors & windows | Sheetrock & stairs
Railing & siding | Texture & metal | Exterior | Cabinets & floors | Counters & such
Rainwater system | Dogrun II | Final stuff

Green Building | Technologies | Credits

The devil's in the details...

The real work of getting ready to pour insulated concrete walls is done after the foam blocks are stacked. Braces assure that the walls will remain straight, plumb and square when concrete is poured into the wall cavities. Anything that must penetrate or be anchored to the walls is provided for at this point also. For example, the main floor will be lightweight concrete poured over a steel pan supported by steel beams and trusses. These members will be supported by steel "ledgers" fastened to the concrete walls.

This page shows some of the technical detail involved at this stage, and won't be of interest to everyone. Therefore this content won't be covered on the final exam.

Photo - 9/13/02
By September 13th, the view from our front porch,
has changed dramatically from the a month earlier.
The stacked insulating blocks are now ready
for the concrete to be poured into them.
Scaffolding is in place for the pour.


Photo - 9/13/02
The lower walls now are braced and ready to be filled with concrete.
But it's not that simple...


Photo - 9/05/02
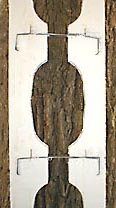
Horizontal steel rebars are fastened under tension to apply strong downward pressure on wire ladders that force the foam blocks together vertically and against the foundation.
Photo - 9/05/02
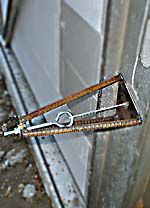
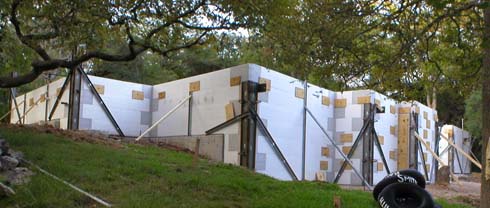
Multiple steel cables pass through the walls and are placed under tension at the corners to force the blocks against each other horizonally, and to support the corner bracing during the pour.
Photo - 9/05/02
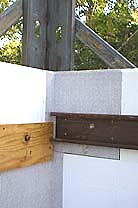
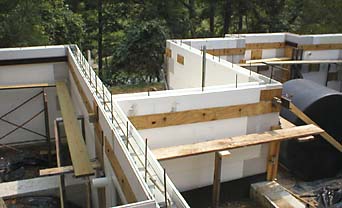
Temporary plywood(left) holds anchor bolts in place for fastening heavy steel ledgers after the concrete is poured. Lighter steel ledgers(right) that support only the floor pan also are in place.
Photo - 9/05/02
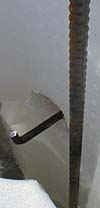
Within the walls, the L-shaped anchor bolts pass through the center of a 4" hole in the foam so that the ledgers will be held by the bolts against concrete rather than foam.
Photo - 9/05/02
Heavy steel plates that will anchor the supporting beams for our decks are held temporarily in place by wood bracing. Out of sight within the wall cavities, heavy horizontal bolts pass through holes in these plates to securely anchor them in the concrete.
Photo - 9/05/02
A horizontal slice of one of the blocks reveals the thin steel that reinforces the block, and provides for anchoring interior and exterior wall materials. Both the temporary plywood and the steel ledgers shown on this page are held in place by screws attached to this steel.
Photo - 9/06/02
Sections of the various pipes and conduits that need to penetrate the lower walls have been put in place. When the concrete is poured, a water-tight seal will result.


Home | Beginnings | Flood | Foundation pour | Blocks & tanks | Cistern
Stacking| Pour prepartion | Wall pour | Floor beams | Floor pan | Floor pour
Stacking II | Interior walls | Moving up | Decks | Upstairs | Roof | Roof II
Dogrun | Roof III | Sticks 'n stones | Decks II | Floors & windows | Sheetrock & stairs
Railing & siding | Texture & metal | Exterior | Cabinets & floors | Counters & such
Rainwater system | Dogrun II | Final stuff

Green Building | Technologies | Credits


©2002 Email: herb at moonmountaingroup.com
http://www.moonmountaingroup.com/home/pourprep.html  -  Modified: Jun-04-03